> ## Documentation Index
> Fetch the complete documentation index at: https://docs.litlyx.com/llms.txt
> Use this file to discover all available pages before exploring further.
# Shopify
> Setup Litlyx in shopify within seconds.
## Pre-Requisites
Before proceeding, ensure you sign up on [Litlyx](https://dashboard.litlyx.com/) and create a new workspace.
## How to Connect Litlyx Analytics to Your Shopify Store
Track what your visitors do, where they come from, and key e-commerce actions... all in one place.
It's divided in two parts:
### 1. Standard Setup (Required)
This step installs the Litlyx script to track visits on all your pages... like the homepage, product pages, and collection pages.
**Setup time:** 1 minute
### 2. Advanced Event Tracking (Optional)
Uses Shopify Web Pixels to automatically send e-commerce events to Litlyx.
**Setup time:** 3 minutes
With this, you can track actions like:
* **Adding a product to the cart**
* **Starting checkout**
* **Completing a purchase**
* **Viewing checkout pages**
These actions are not tracked by the standard setup alone. For full e-commerce tracking, we recommend enabling this step.
## Step 1: Standard Setup (mandatory)
This mode turns on Litlyx for all the public pages of your site.
Steps
1. Access the Shopify panel.
2. Go on `Sales Channels` > `Online Store` > `Themes`.
3. Find the `active theme`, click on the 3 dots button `(⋮)` and select **Edit code**.
4. Open the file: `layout/theme.liquid`.
 ### Insert script into the head section.
1. In the `theme.liquid` file, look for the `` tag.
2. Paste the following code just right before ``:
```javascript theme={null}
```
3. Change `workspace_id` with your workspace\_id from Litlyx’s dashboard.
4. Click on **Save** on the top-right corner.
### Insert script into the head section.
1. In the `theme.liquid` file, look for the `` tag.
2. Paste the following code just right before ``:
```javascript theme={null}
```
3. Change `workspace_id` with your workspace\_id from Litlyx’s dashboard.
4. Click on **Save** on the top-right corner.
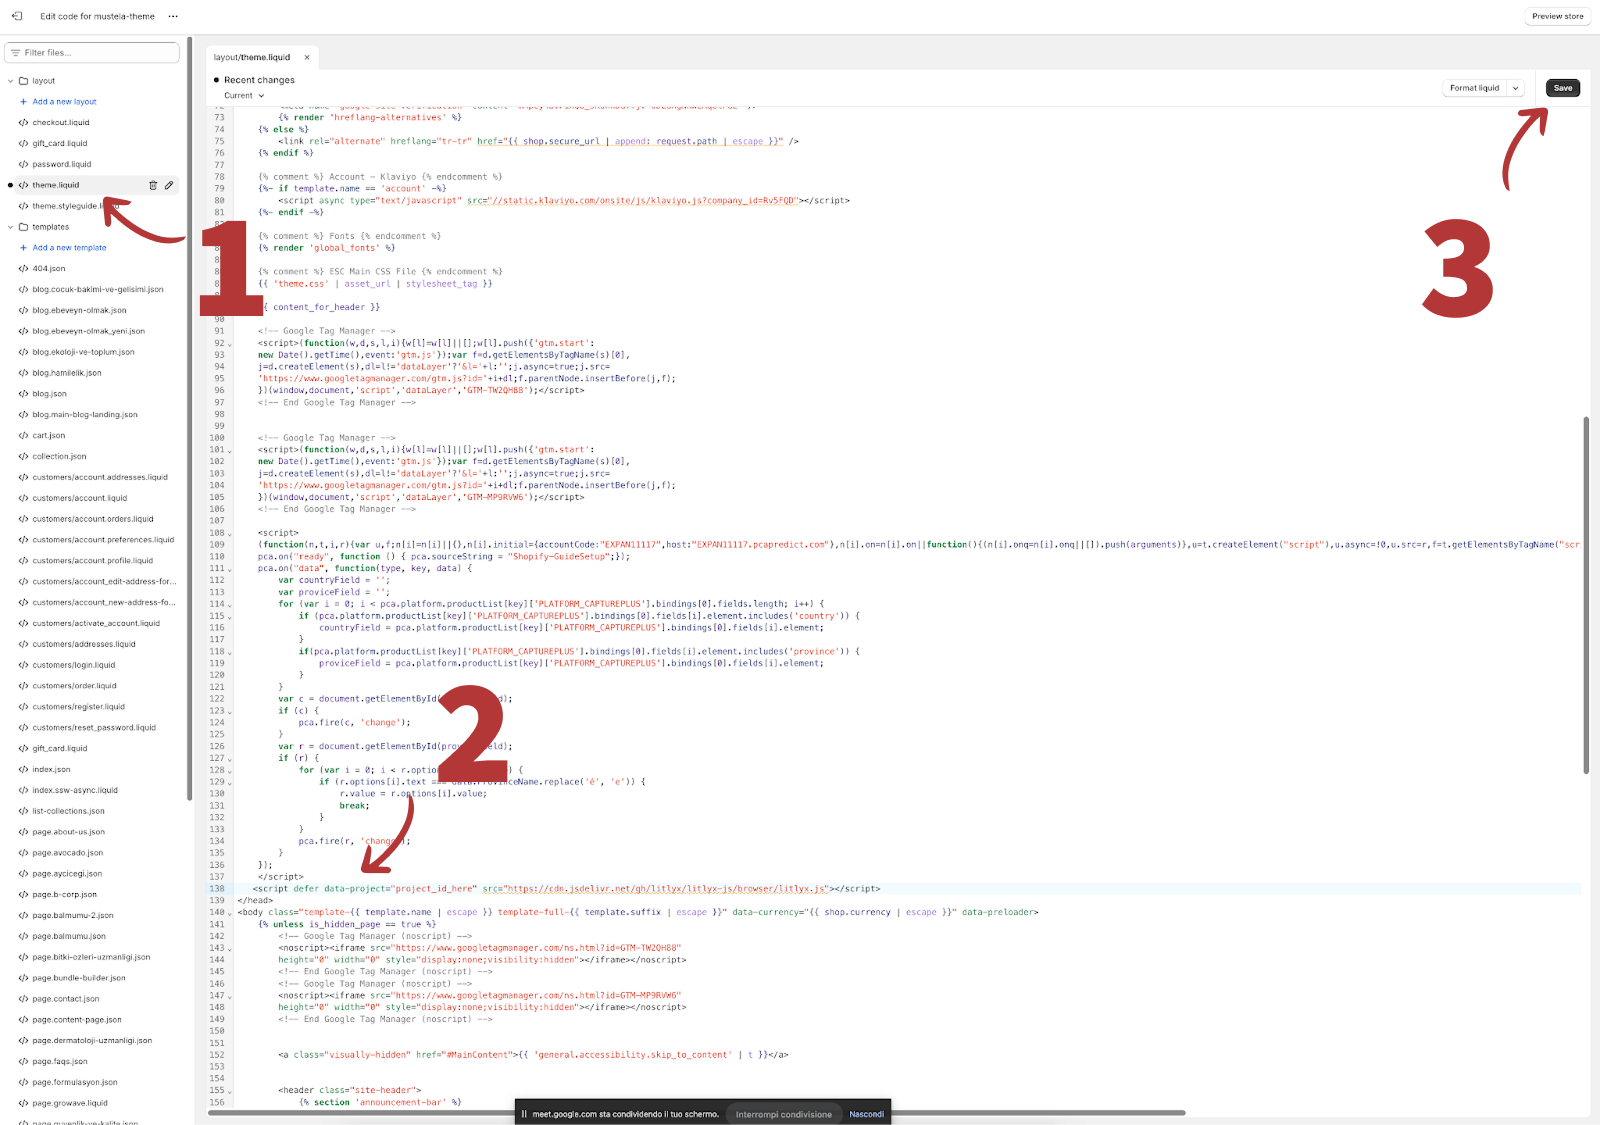 **That’s it!** Litlyx is now up and running.
It’s already tracking key metrics like `visitor counts`, `real-time users`, `top pages`, `traffic sources`, `bounce rate`, and more.
Now you’re ready to set up the second part… this will let you send custom events to Litlyx for deeper insights.
## Track custom events with Web Pixels API (optional)
Send advanced e-commerce events from Shopify directly to Litlyx's Custom Events page.
* **page\_viewed**
* **product\_viewed**
* **product\_added\_to\_cart**
* **product\_removed\_from\_cart**
* **checkout\_started**
* **checkout\_completed**
[Web Pixel Shopify Documentation](https://shopify.dev/docs/api/web-pixels-api#app-web-pixels)
### How to activate your Web Pixel
1. Go on `Shopify Admin` > `Settings` > `Customer events`.
**That’s it!** Litlyx is now up and running.
It’s already tracking key metrics like `visitor counts`, `real-time users`, `top pages`, `traffic sources`, `bounce rate`, and more.
Now you’re ready to set up the second part… this will let you send custom events to Litlyx for deeper insights.
## Track custom events with Web Pixels API (optional)
Send advanced e-commerce events from Shopify directly to Litlyx's Custom Events page.
* **page\_viewed**
* **product\_viewed**
* **product\_added\_to\_cart**
* **product\_removed\_from\_cart**
* **checkout\_started**
* **checkout\_completed**
[Web Pixel Shopify Documentation](https://shopify.dev/docs/api/web-pixels-api#app-web-pixels)
### How to activate your Web Pixel
1. Go on `Shopify Admin` > `Settings` > `Customer events`.
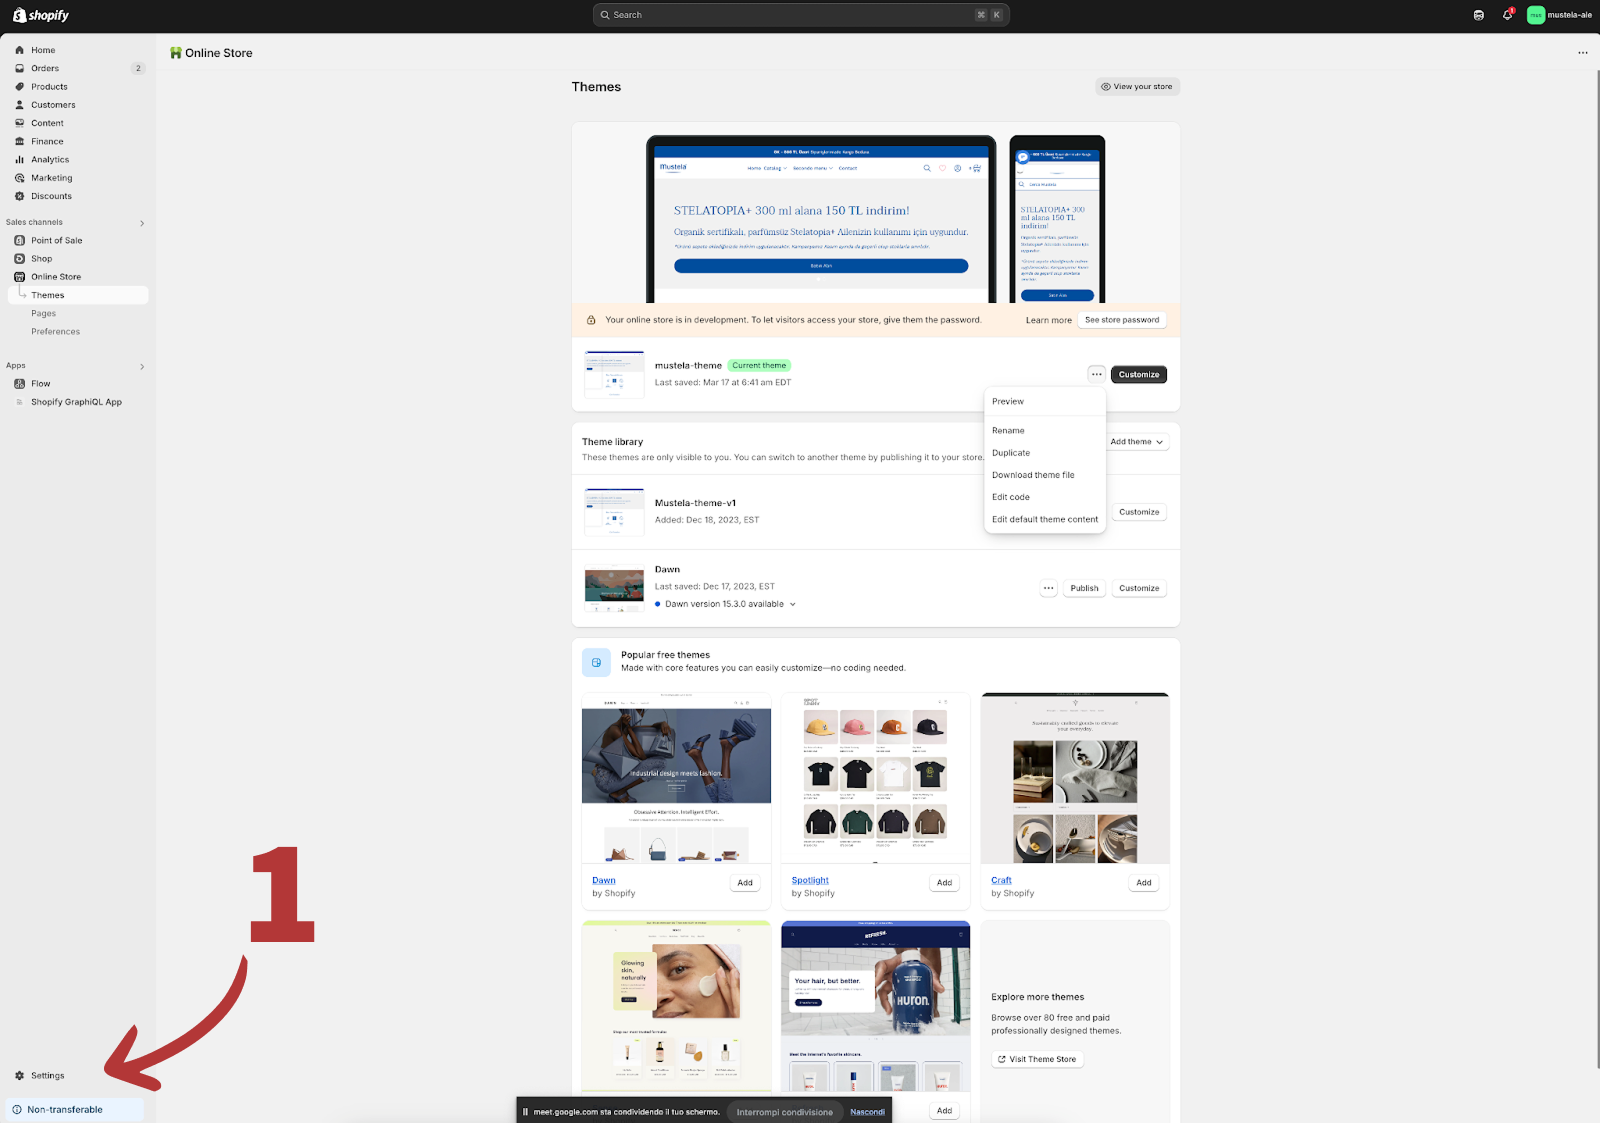 2. Click on `Create Custom Pixel`.
3. Give your Pixel a name, e.g. **Litlyx Web Pixel**.
4. Click on `Add Pixel` to save.
2. Click on `Create Custom Pixel`.
3. Give your Pixel a name, e.g. **Litlyx Web Pixel**.
4. Click on `Add Pixel` to save.
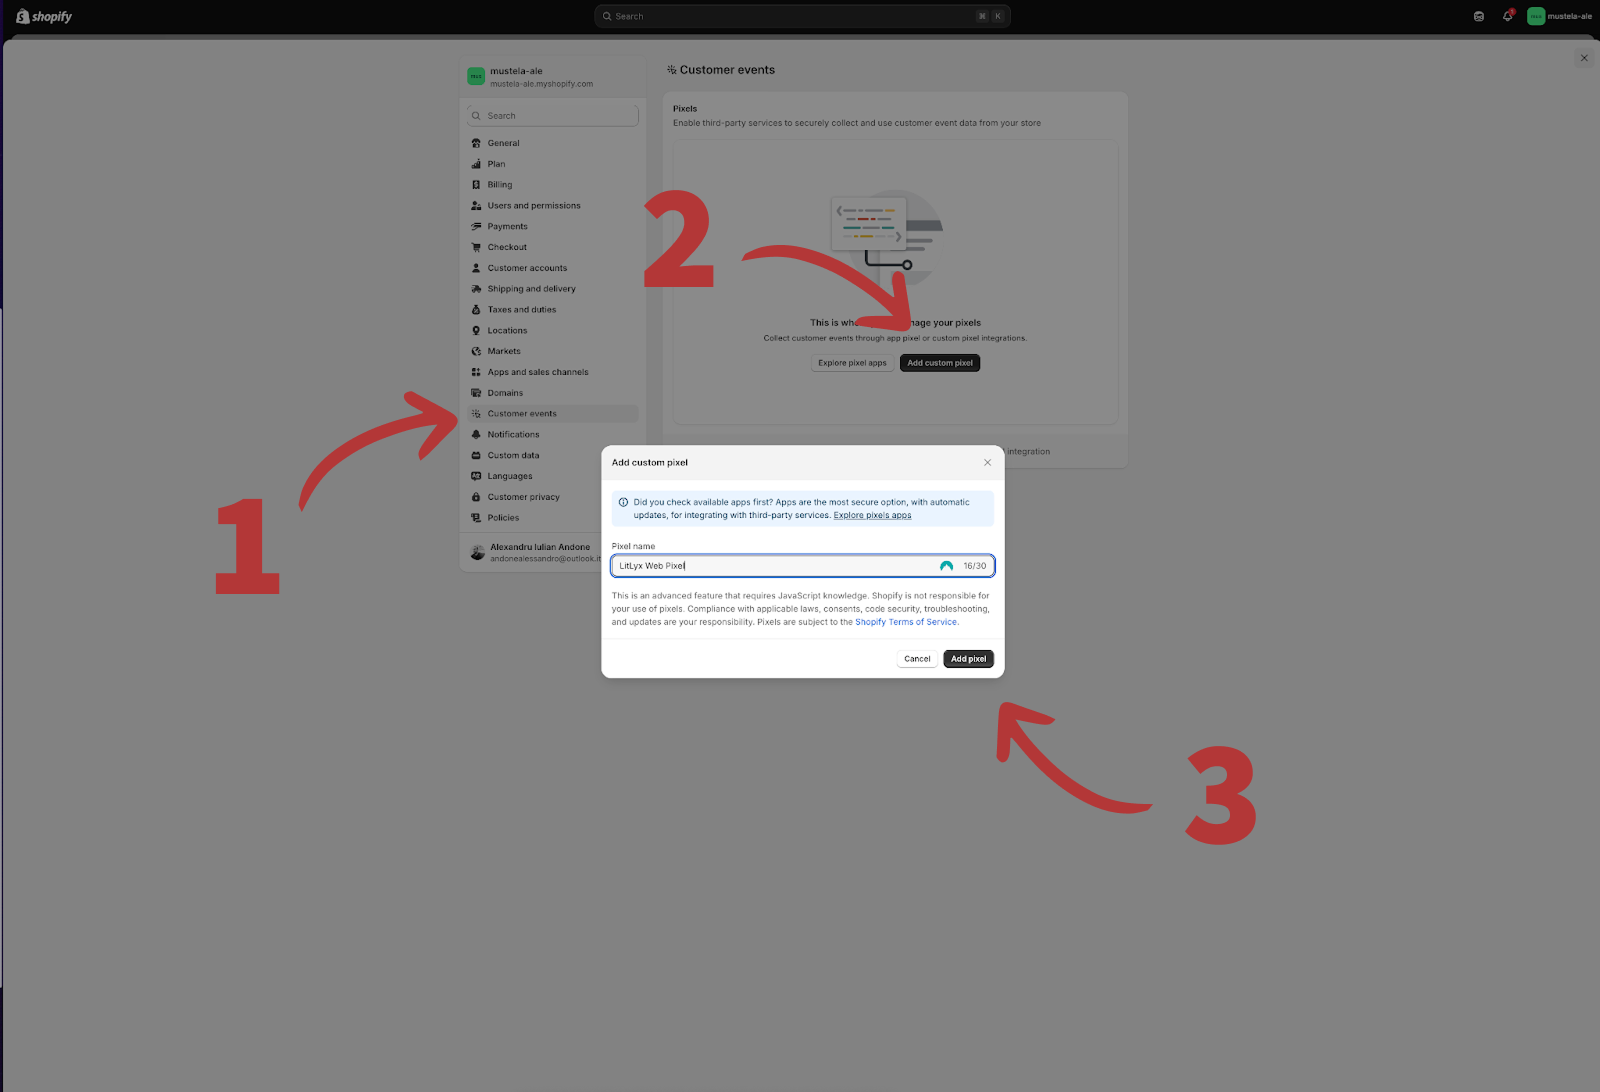 5. Look for the `code` field.
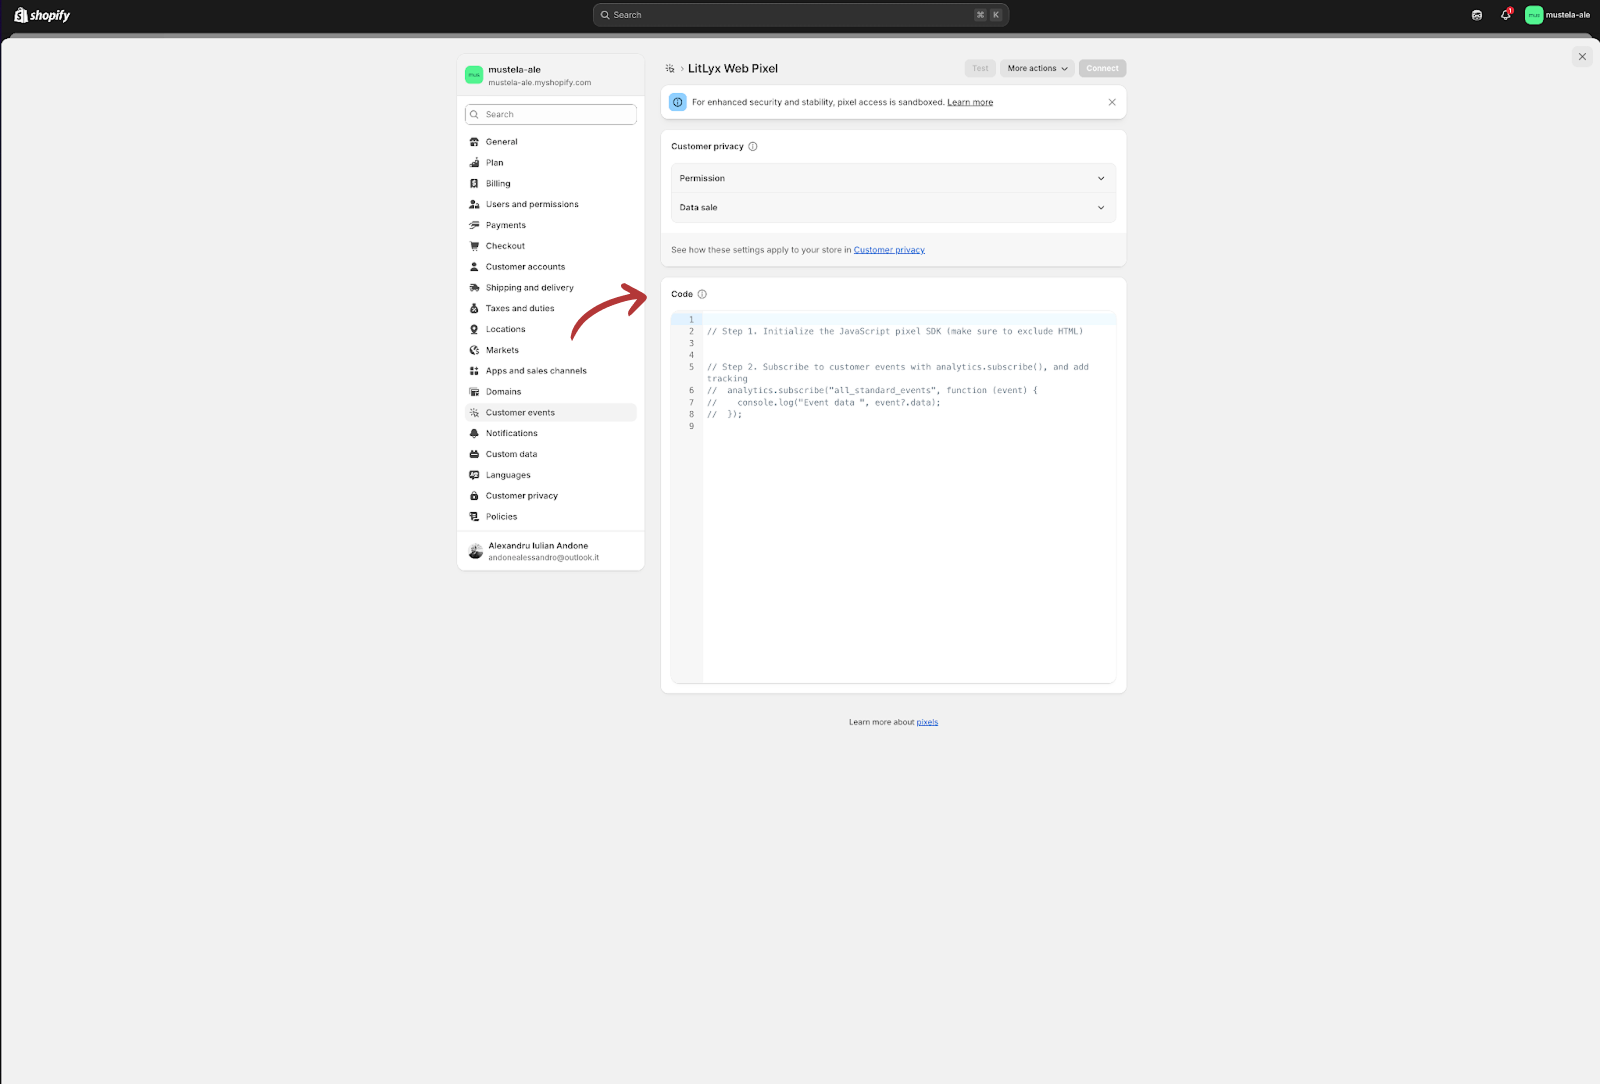 6. Enter the following code:
```javascript theme={null}
const script = document.createElement('script');
script.defer = true;
// Important step
script.dataset.manual = true;
// Change with you workspace_id
script.dataset.workspace = "workspace_id";
script.src = 'https://cdn.jsdelivr.net/npm/litlyx-js@latest/browser/litlyx.js';
document.head.appendChild(script);
script.onload = () => {
//See the examples below to add
//the scripts you need in this section.
};
```
7. Click on `Connect`.
6. Enter the following code:
```javascript theme={null}
const script = document.createElement('script');
script.defer = true;
// Important step
script.dataset.manual = true;
// Change with you workspace_id
script.dataset.workspace = "workspace_id";
script.src = 'https://cdn.jsdelivr.net/npm/litlyx-js@latest/browser/litlyx.js';
document.head.appendChild(script);
script.onload = () => {
//See the examples below to add
//the scripts you need in this section.
};
```
7. Click on `Connect`.
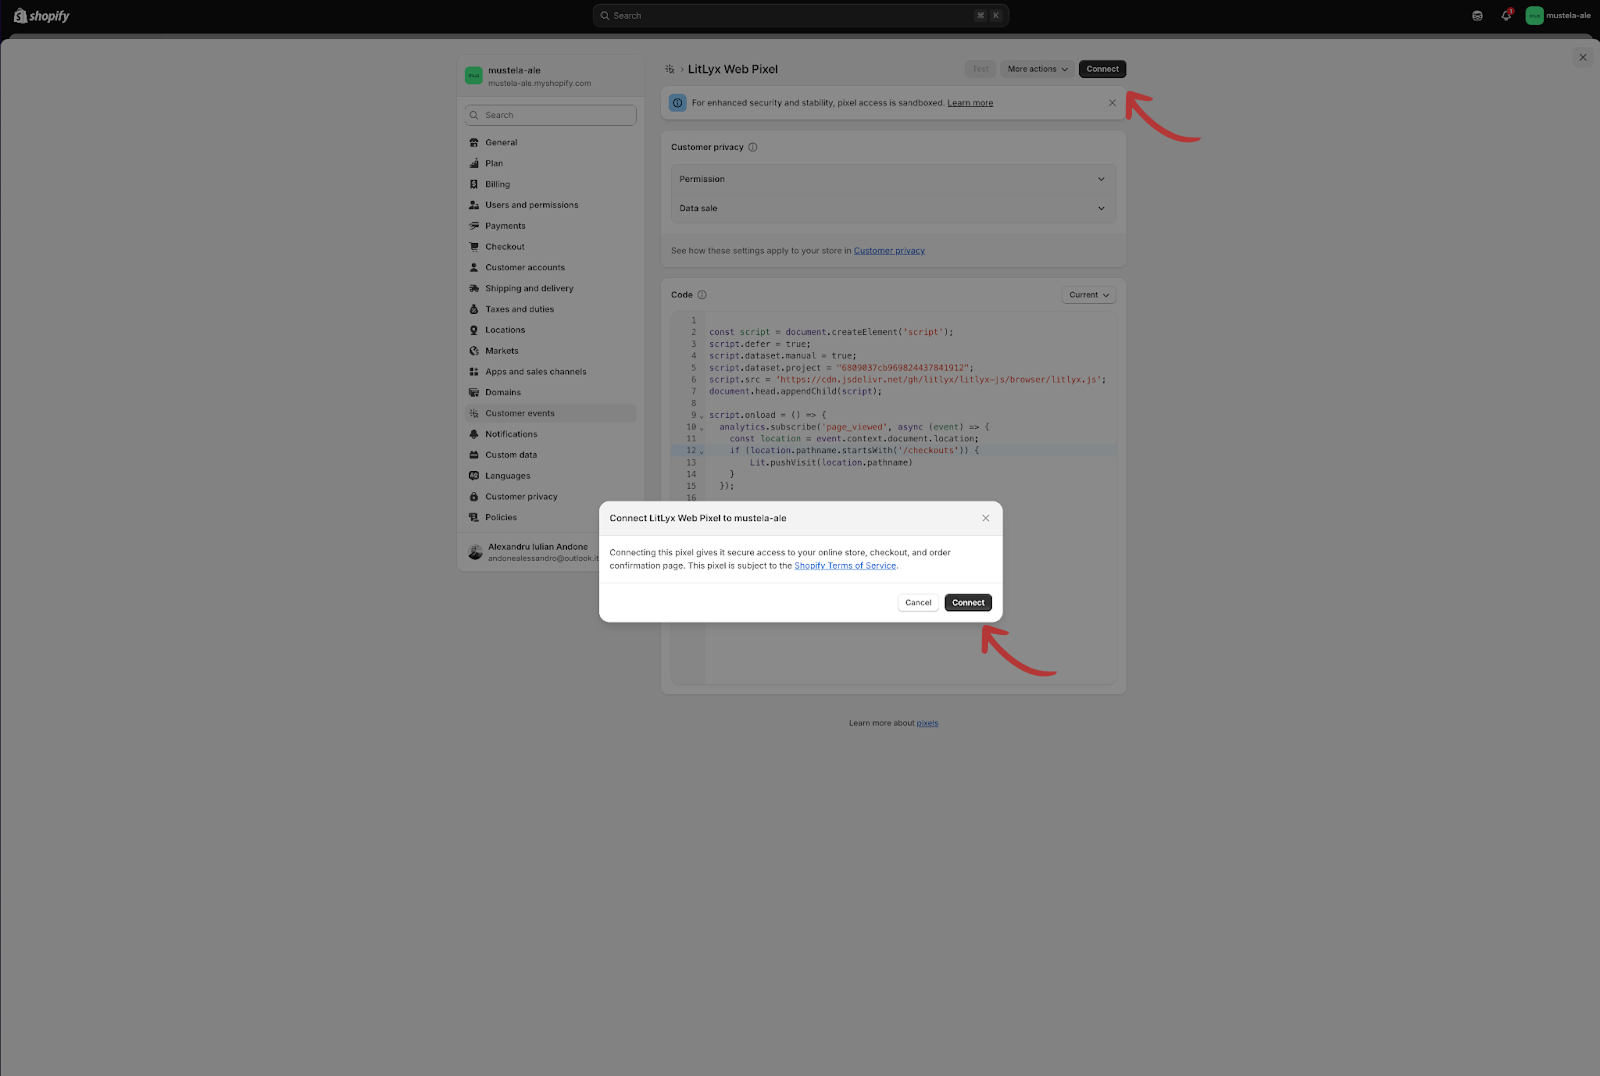 Your new Pixel is all set to track the events you want to send to Litlyx’s dashboard.
Let’s take a look at some events we think you’ll enjoy keeping an eye on.
## Track e-commerce events in Litlyx using Custom Events
Here is a summary of the events supported by Shopify and trackable with `analytics.subscribe()` function.
| purpose | Shopify event purpose |
| --------------------------- | ------------------------------------------- |
| `product_viewed` | User checks a product. |
| `product_added_to_cart` | User adds a product to the cart. |
| `product_removed_from_cart` | User removes a product from the cart. |
| `cart_viewed` | User checks the cart. |
| `checkout_started` | User starts the checkout process. |
| `checkout_completed` | User finalizes the order. |
| `page_viewed` | Page view (including checkout if filtered). |
[List of all ecommerce events available on Shopify](https://shopify.dev/docs/api/web-pixels-api/standard-events)
## Most common E-commerce events you may want to track
💡 You can also use analytics.subscribe("all\_standard\_events", ...) to debug and try all available events.
### product\_viewed
```javascript theme={null}
analytics.subscribe("product_viewed", (event) => {
const variantTitle = event.data.productVariant.title ?? "";
const productTitle = event.data.productVariant.product.title;
const productId = event.data.productVariant.product.id;
const price = event.data.productVariant.price.amount;
const currency = event.data.productVariant.price.currencyCode;
Lit.event("Product viewed", {
product_id: productId,
title: `${productTitle} ${variantTitle}`,
price,
currency
});
});
```
### product\_added\_to\_cart
```javascript theme={null}
analytics.subscribe('product_added_to_cart', (event) => {
const line = event.data.cartLine;
const title = `${line.merchandise.product.title} ${line.merchandise.title}`;
const price = line.cost.totalAmount.amount;
const currency = line.cost.totalAmount.currencyCode;
Lit.event('Add to cart', {
metadata: {
"product-name": title,
"price": price,
"currency": currency
}
});
});
```
### checkout\_started
```javascript theme={null}
analytics.subscribe('checkout_started', (event) => {
const amount = event.data.checkout.totalPrice.amount;
const currency = event.data.checkout.currencyCode;
Lit.event('Checkout started', {
metadata: {
amount,
currency
}
});
});
```
### checkout\_completed
```javascript theme={null}
analytics.subscribe('checkout_completed', (event) => {
const checkout = event.data.checkout;
const totalPrice = checkout.totalPrice?.amount;
const discounts = checkout.discountApplications.map(d => d.title);
const firstItem = checkout.lineItems[0];
const firstItemDiscount = firstItem.discountAllocations[0]?.amount;
const transactions = checkout.transactions.map(tx => ({
paymentGateway: tx.gateway,
amount: tx.amount
}));
Lit.event('Checkout Completed', {
metadata: {
totalPrice,
discountCodesUsed: discounts,
firstItem: {
quantity: firstItem.quantity,
title: firstItem.title,
discount: firstItemDiscount
},
paymentTransactions: transactions
}
});
});
```
## Send checkout page views from Shopify to your Litlyx dashboard
The standard script doesn’t track checkout pages, because Shopify handles them differently from normal pages.
To track these pages, you need to use a `Web Pixel` and listen for the `page_viewed` event...
then check the page’s path (also called pathname).
Here are some common checkout paths you might want to track:
| page type | URL |
| ---------------------------- | --------------------------- |
| `Start checkout` | /checkouts/cn/... |
| `Shipping` | /checkouts/cn/.../shipping |
| `Payment` | /checkouts/cn/.../payment |
| `Review` | /checkouts/cn/.../review |
| `Thank-you (Order complete)` | /checkouts/cn/.../thank-you |
### Code to track page\_viewed in checkout
```javascript theme={null}
analytics.subscribe('page_viewed', async (event) => {
const location = event.context.document.location;
if (location.pathname.startsWith('/checkouts')) {
Lit.pushVisit(location.pathname)
}
});
```
This event is only used to track checkout pages. For all other pages, the “Page Viewed” event is handled by the code added in the `theme.liquid` file (see Step 1).
Your new Pixel is all set to track the events you want to send to Litlyx’s dashboard.
Let’s take a look at some events we think you’ll enjoy keeping an eye on.
## Track e-commerce events in Litlyx using Custom Events
Here is a summary of the events supported by Shopify and trackable with `analytics.subscribe()` function.
| purpose | Shopify event purpose |
| --------------------------- | ------------------------------------------- |
| `product_viewed` | User checks a product. |
| `product_added_to_cart` | User adds a product to the cart. |
| `product_removed_from_cart` | User removes a product from the cart. |
| `cart_viewed` | User checks the cart. |
| `checkout_started` | User starts the checkout process. |
| `checkout_completed` | User finalizes the order. |
| `page_viewed` | Page view (including checkout if filtered). |
[List of all ecommerce events available on Shopify](https://shopify.dev/docs/api/web-pixels-api/standard-events)
## Most common E-commerce events you may want to track
💡 You can also use analytics.subscribe("all\_standard\_events", ...) to debug and try all available events.
### product\_viewed
```javascript theme={null}
analytics.subscribe("product_viewed", (event) => {
const variantTitle = event.data.productVariant.title ?? "";
const productTitle = event.data.productVariant.product.title;
const productId = event.data.productVariant.product.id;
const price = event.data.productVariant.price.amount;
const currency = event.data.productVariant.price.currencyCode;
Lit.event("Product viewed", {
product_id: productId,
title: `${productTitle} ${variantTitle}`,
price,
currency
});
});
```
### product\_added\_to\_cart
```javascript theme={null}
analytics.subscribe('product_added_to_cart', (event) => {
const line = event.data.cartLine;
const title = `${line.merchandise.product.title} ${line.merchandise.title}`;
const price = line.cost.totalAmount.amount;
const currency = line.cost.totalAmount.currencyCode;
Lit.event('Add to cart', {
metadata: {
"product-name": title,
"price": price,
"currency": currency
}
});
});
```
### checkout\_started
```javascript theme={null}
analytics.subscribe('checkout_started', (event) => {
const amount = event.data.checkout.totalPrice.amount;
const currency = event.data.checkout.currencyCode;
Lit.event('Checkout started', {
metadata: {
amount,
currency
}
});
});
```
### checkout\_completed
```javascript theme={null}
analytics.subscribe('checkout_completed', (event) => {
const checkout = event.data.checkout;
const totalPrice = checkout.totalPrice?.amount;
const discounts = checkout.discountApplications.map(d => d.title);
const firstItem = checkout.lineItems[0];
const firstItemDiscount = firstItem.discountAllocations[0]?.amount;
const transactions = checkout.transactions.map(tx => ({
paymentGateway: tx.gateway,
amount: tx.amount
}));
Lit.event('Checkout Completed', {
metadata: {
totalPrice,
discountCodesUsed: discounts,
firstItem: {
quantity: firstItem.quantity,
title: firstItem.title,
discount: firstItemDiscount
},
paymentTransactions: transactions
}
});
});
```
## Send checkout page views from Shopify to your Litlyx dashboard
The standard script doesn’t track checkout pages, because Shopify handles them differently from normal pages.
To track these pages, you need to use a `Web Pixel` and listen for the `page_viewed` event...
then check the page’s path (also called pathname).
Here are some common checkout paths you might want to track:
| page type | URL |
| ---------------------------- | --------------------------- |
| `Start checkout` | /checkouts/cn/... |
| `Shipping` | /checkouts/cn/.../shipping |
| `Payment` | /checkouts/cn/.../payment |
| `Review` | /checkouts/cn/.../review |
| `Thank-you (Order complete)` | /checkouts/cn/.../thank-you |
### Code to track page\_viewed in checkout
```javascript theme={null}
analytics.subscribe('page_viewed', async (event) => {
const location = event.context.document.location;
if (location.pathname.startsWith('/checkouts')) {
Lit.pushVisit(location.pathname)
}
});
```
This event is only used to track checkout pages. For all other pages, the “Page Viewed” event is handled by the code added in the `theme.liquid` file (see Step 1).